Creating your own server instance server
NOTE
This guide assumes you're using ASP.NET Core to host your authorization server. For samples showing how to use the OpenIddict server feature in ASP.NET 4.6.2+ applications, see OWIN/ASP.NET 4.8 samples.
To implement a custom OpenID Connect server using OpenIddict, the simplest option is to clone one of the official samples from the openiddict-samples repository.
If you don't want to start from one of the recommended samples, you'll need to:
Reuse an existing project or create a new one: when creating a new project using Visual Studio's default ASP.NET Core template, using individual user accounts authentication is strongly recommended as it automatically includes the default ASP.NET Core Identity UI, based on Razor Pages, should you later need to implement a user authentication flow like the authorization code flow.
Update your
.csprojfile to reference the latestOpenIddict.AspNetCoreandOpenIddict.EntityFrameworkCorepackages:
<PackageReference Include="OpenIddict.AspNetCore" Version="7.2.0" />
<PackageReference Include="OpenIddict.EntityFrameworkCore" Version="7.2.0" />- Register your Entity Framework Core database context and configure the OpenIddict core services in
Program.cs(orStartup.cs, depending on whether you're using the minimal host or the regular host):
services.AddDbContext<ApplicationDbContext>(options =>
{
    // Configure Entity Framework Core to use Microsoft SQL Server.
    options.UseSqlServer(Configuration.GetConnectionString("DefaultConnection"));

    // Register the entity sets needed by OpenIddict.
    // Note: use the generic overload if you need to replace the default OpenIddict entities.
    options.UseOpenIddict();
});

services.AddOpenIddict()

    // Register the OpenIddict core components.
    .AddCore(options =>
    {
        // Configure OpenIddict to use the Entity Framework Core stores and models.
        // Note: call ReplaceDefaultEntities() to replace the default entities.
        options.UseEntityFrameworkCore()
               .UseDbContext<ApplicationDbContext>();
});- Configure the OpenIddict server services:
services.AddOpenIddict()

    // Register the OpenIddict server components.
    .AddServer(options =>
    {
        // Enable the token endpoint.
        options.SetTokenEndpointUris("connect/token");

        // Enable the client credentials flow.
        options.AllowClientCredentialsFlow();

        // Register the signing and encryption credentials.
        options.AddDevelopmentEncryptionCertificate()
               .AddDevelopmentSigningCertificate();

        // Register the ASP.NET Core host and configure the ASP.NET Core options.
        options.UseAspNetCore()
               .EnableTokenEndpointPassthrough();
});- Make sure the ASP.NET Core authentication middleware is correctly registered at the right place:
app.UseDeveloperExceptionPage();

app.UseForwardedHeaders();

app.UseRouting();
app.UseCors();

app.UseAuthentication();
app.UseAuthorization();

app.UseEndpoints(options =>
{
    options.MapControllers();
    options.MapDefaultControllerRoute();
});- Create your own authorization controller:
NOTE
Implementing a custom authorization controller is required to allow OpenIddict to create tokens based on the identities and claims you provide.
Here's an example for the client credentials grant:
public class AuthorizationController : Controller
{
    private readonly IOpenIddictApplicationManager _applicationManager;

    public AuthorizationController(IOpenIddictApplicationManager applicationManager)
        => _applicationManager = applicationManager;

    [HttpPost("~/connect/token"), Produces("application/json")]
    public async Task<IActionResult> Exchange()
    {
        var request = HttpContext.GetOpenIddictServerRequest();
        if (request.IsClientCredentialsGrantType())
        {
            // Note: the client credentials are automatically validated by OpenIddict:
            // if client_id or client_secret are invalid, this action won't be invoked.

            var application = await _applicationManager.FindByClientIdAsync(request.ClientId) ??
                throw new InvalidOperationException("The application cannot be found.");

            // Create a new ClaimsIdentity containing the claims that
            // will be used to create an id_token, a token or a code.
            var identity = new ClaimsIdentity(TokenValidationParameters.DefaultAuthenticationType, Claims.Name, Claims.Role);

            // Use the client_id as the subject identifier.
            identity.SetClaim(Claims.Subject, await _applicationManager.GetClientIdAsync(application));
            identity.SetClaim(Claims.Name, await _applicationManager.GetDisplayNameAsync(application));

            identity.SetDestinations(static claim => claim.Type switch
            {
                // Allow the "name" claim to be stored in both the access and identity tokens
                // when the "profile" scope was granted (by calling principal.SetScopes(...)).
                Claims.Name when claim.Subject.HasScope(Scopes.Profile)
                    => [Destinations.AccessToken, Destinations.IdentityToken],

                // Otherwise, only store the claim in the access tokens.
                _ => [Destinations.AccessToken]
            });

            return SignIn(new ClaimsPrincipal(identity), OpenIddictServerAspNetCoreDefaults.AuthenticationScheme);
        }

        throw new NotImplementedException("The specified grant is not implemented.");
    }
}- Register your client application (e.g using an
IHostedServiceimplementation):
public class Worker : IHostedService
{
    private readonly IServiceProvider _serviceProvider;

    public Worker(IServiceProvider serviceProvider)
        => _serviceProvider = serviceProvider;

    public async Task StartAsync(CancellationToken cancellationToken)
    {
        using var scope = _serviceProvider.CreateScope();

        var context = scope.ServiceProvider.GetRequiredService<ApplicationDbContext>();
        await context.Database.EnsureCreatedAsync();

        var manager = scope.ServiceProvider.GetRequiredService<IOpenIddictApplicationManager>();

        if (await manager.FindByClientIdAsync("service-worker") is null)
        {
            await manager.CreateAsync(new OpenIddictApplicationDescriptor
            {
                ClientId = "service-worker",
                ClientSecret = "388D45FA-B36B-4988-BA59-B187D329C207",
                Permissions =
                {
                    Permissions.Endpoints.Token,
                    Permissions.GrantTypes.ClientCredentials
                }
            });
        }
    }

    public Task StopAsync(CancellationToken cancellationToken) => Task.CompletedTask;
}
NOTE
Before running the application, make sure the database is updated with OpenIddict tables by running Add-Migration and Update-Database.
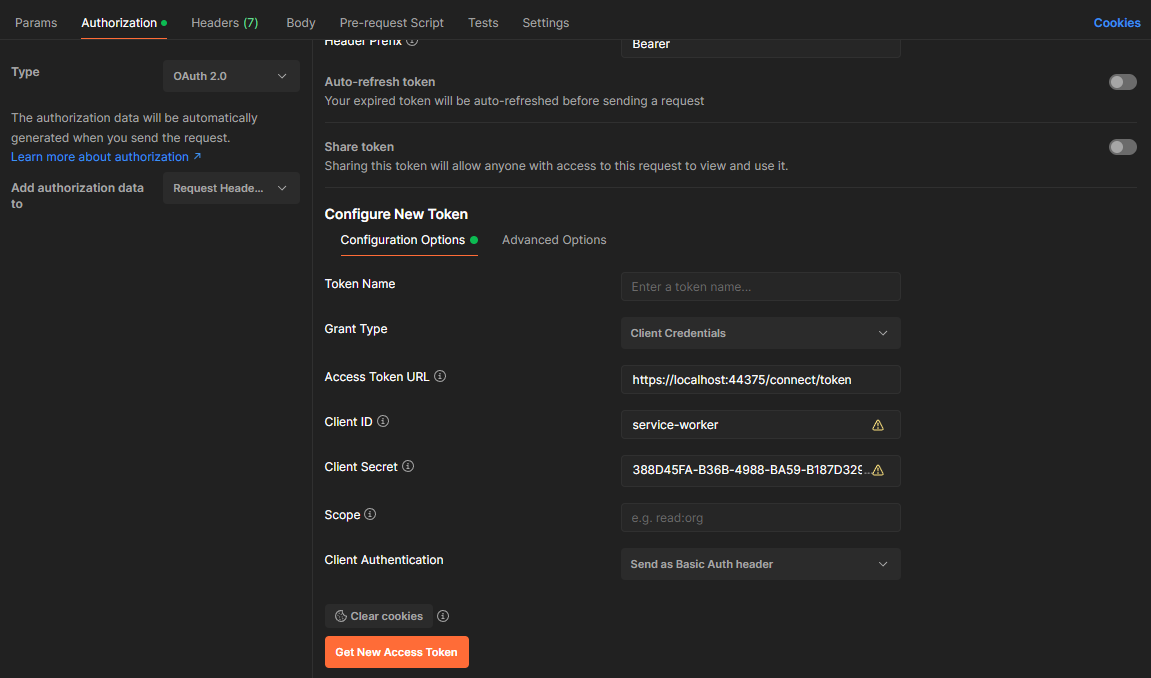
- Test your server implementation using Postman:

TIP
Recommended read: Implementing token validation in your APIs.
